Tuesday, December 4, 2012

Selecting Data by Joining Tables using ADO.Net Entity Framework


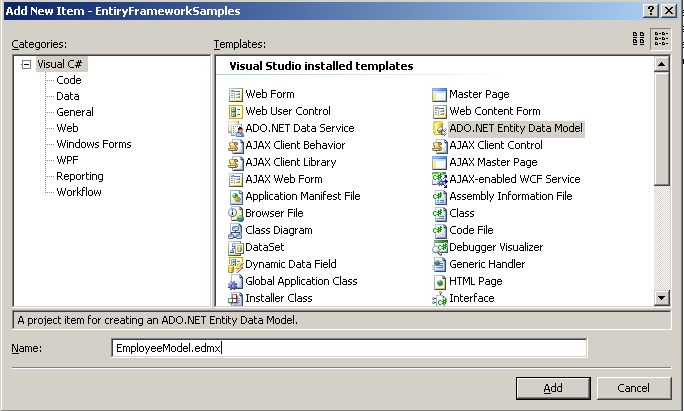
In order to select data from a Model using the ADO.Net Entity Data Model, we should first create an ADO.Net Entity Data Model class, refer to the post Creating your First ADO.Net Entity Data Model to see on how to create an ADO.Net Entity Data Model, that maps to the physical database.

Once you have created the ADO.Net Entity Data Model class, we can proceed with querying the model to select data. In this post we shall see on how to use the ADO.Net Entity Data Model to query the data from more than 1 underlying physical database and display the results of the query in a GridView.

1. Create a new .aspx page, I have created a page ViewEmployees.aspx
2. Add a GridView control to the page, which will display the results of the Select Query.
3. Add the necessary Bound and Template columns to the Grid.

<asp:GridView
    ID="grdEmployees"
    runat="server"
    CellPadding="2"
    CellSpacing="2"
    HeaderStyle-Font-Names="Verdana"
    HeaderStyle-Font-Size="15px"
    HeaderStyle-BackColor="Silver"
    RowStyle-Font-Names="Verdana"
    RowStyle-Font-Size="14px"
    AutoGenerateColumns="false" onrowcommand="grdEmployees_RowCommand">
    <Columns>
        <asp:BoundField DataField="ID" HeaderText="Employee ID" />
        <asp:BoundField DataField="Name" HeaderText="Name" />
        <asp:BoundField DataField="Phone" HeaderText="Phone" />
        <asp:BoundField DataField="DepartmentName" HeaderText="Department" />
        <asp:BoundField DataField="Salery" HeaderText="Salery" />
        <asp:TemplateField HeaderText="EDIT">
            <ItemTemplate>
                <a href="ViewEmployees.aspx?ID=<%#Eval("ID")                 
                  %>">EDIT</a>
            </ItemTemplate>
        </asp:TemplateField>
        <asp:TemplateField HeaderText="DELETE">
            <ItemTemplate>
                <asp:LinkButton ID="lnkDelete" runat="server"
                    CausesValidation="false" CommandArgument='<%#Eval("ID") %>'
                    CommandName="lnkDeleteButton" OnClientClick="return confirm('Are                        You Sure, You Want to Delete this Employee?');"
                    Text="DELETE">
                </asp:LinkButton>
            </ItemTemplate>
        </asp:TemplateField>
    </Columns>
</asp:GridView>

4. Once we have the Grid in place, we shall switch to the code-behind to use the ADO.Net Entity Data Model to query the database.
5. Add a reference to the ADO.Net Entity Data Model
EmployeesEntities dbContext = new EmployeesEntities();

Refer to the post Creating your First ADO.Net Entity Data Model, to see on how to add an ADO.Net Entity Data Model class to the project, which maps to the Physical database.

6. Now use the reference, to run Queries against the model as follows.

var emp = (from e in dbContext.Employee
           select new { e.ID,
                        e.Name,
                        e.Phone,
                        DepartmentName = e.Department.Name,
                        e.Salery });
//
grdEmployees.DataSource = emp.ToList();
grdEmployees.DataBind();

7. Notice that we have not explicitly joined the tables in the query, insead we are just refering to the Name in the Department Table, ADO.Net Entity Framework does the Table Join internally.

8. That’s it once the Application runs the LINQ Query gets executed and the results get displayed on the Grid.
Related Post
Concepts
ADO.NET Entity Framework
ADO.NET Entity Framework Architecture
Entity Data Model
LINQ To SQL Vs ADO.Net Entity Framework


Programming
ADO.Net Entity Data Model Prerequisite
Creating your First ADO.Net Entity Data Model
Selecting Data using ADO.Net Entity Framework
Selecting Data by Joining Tables using ADO.Net Entity Framework
Inserting Data using ADO.Net Entity Framework
Inserting Data with Foreign Key Reference using ADO.Net Entity Framework
Updating Data using ADO.Net Entity Framework
Updating Data with Foreign Key Reference using ADO.Net Entity Framework
Deleting Data using ADO.Net Entity Framework
Selecting Data using ADO.Net Entity Data Model

In order to select data from a Model using the ADO.Net Entity Data Model, we should first create an ADO.Net Entity Data Model class, refer to the post Creating your First ADO.Net Entity Data Model to see on how to create an ADO.Net Entity Data Model, that maps to the physical database.

Once you have created the ADO.Net Entity Data Model class, we can proceed with querying the model to select data. In this post we shall see on how to use the ADO.Net Entity Data Model to query the data from the underlying physical database and display the results of the query in a GridView.


1. Create a new .aspx page, I have created a page ViewEmployees.aspx
2. Add a
GridView control to the page, which will display the results of the Select Query.
3. Add the necessary Bound and Template columns to the Grid.

<asp:GridView
    ID="grdEmployees"
    runat="server"
    CellPadding="2"
    CellSpacing="2"
    HeaderStyle-Font-Names="Verdana"
    HeaderStyle-Font-Size="15px"
    HeaderStyle-BackColor="Silver"
    RowStyle-Font-Names="Verdana"
    RowStyle-Font-Size="14px"
    AutoGenerateColumns="false" onrowcommand="grdEmployees_RowCommand">
    <Columns>
        <asp:BoundField DataField="ID" HeaderText="Employee ID" />
        <asp:BoundField DataField="Name" HeaderText="Name" />
        <asp:BoundField DataField="Phone" HeaderText="Phone" />
        <asp:TemplateField HeaderText="EDIT">
            <ItemTemplate>
                <a href="ViewEmployees.aspx?ID=<%#Eval("ID")                 
                  %>">EDIT</a>
            </ItemTemplate>
        </asp:TemplateField>
        <asp:TemplateField HeaderText="DELETE">
            <ItemTemplate>
                <asp:LinkButton ID="lnkDelete" runat="server"
                    CausesValidation="false" CommandArgument='<%#Eval("ID") %>'
                    CommandName="lnkDeleteButton" OnClientClick="return confirm('Are                        You Sure, You Want to Delete this Employee?');"
                    Text="DELETE">
                </asp:LinkButton>
            </ItemTemplate>
        </asp:TemplateField>
    </Columns>
</asp:GridView>

4. Once we have the Grid in place, we shall switch to the code-behind to use the ADO.Net Entity Data Model to query the database.
5. Add a reference to the ADO.Net Entity Data Model
EmployeesEntities dbContext = new EmployeesEntities();

Refer to the post Creating your First ADO.Net Entity Data Model, to see on how to add an ADO.Net Entity Data Model class to the project, which maps to the Physical database.

6. Now use the reference, to run Queries against the model as follows.

var emp = (from e in dbContext.Employee
           select new { e.ID, e.Name, e.Phone });
//
grdEmployees.DataSource = emp.ToList();
grdEmployees.DataBind();

7. That’s it once the Application runs the LINQ Query gets executed and the results get displayed on the Grid.
Related Post
Concepts
ADO.NET Entity Framework
ADO.NET Entity Framework Architecture
Entity Data Model
LINQ To SQL Vs ADO.Net Entity Framework


Programming
ADO.Net Entity Data Model Prerequisite
Creating your First ADO.Net Entity Data Model
Selecting Data using ADO.Net Entity Framework
Selecting Data by Joining Tables using ADO.Net Entity Framework
Inserting Data using ADO.Net Entity Framework
Inserting Data with Foreign Key Reference using ADO.Net Entity Framework
Updating Data using ADO.Net Entity Framework
Updating Data with Foreign Key Reference using ADO.Net Entity Framework
Deleting Data using ADO.Net Entity Framework
Creating your First ADO.Net Entity Data Model

First let us create a new ASP.Net Web application project. Note that ADO.Net Entity Data Model Template is not a project type template, it is a file type template, means that you first need to create a project, then add ADO.Net Entity Data Model Template as one of the Items to the project.

Make sure that your Project is mapped to targets Framework 3.5 or Higher, you can check this is the Project Properties, in the Project properties window check that the Target Framework property is set to .net Framework 3.5 or Higher.


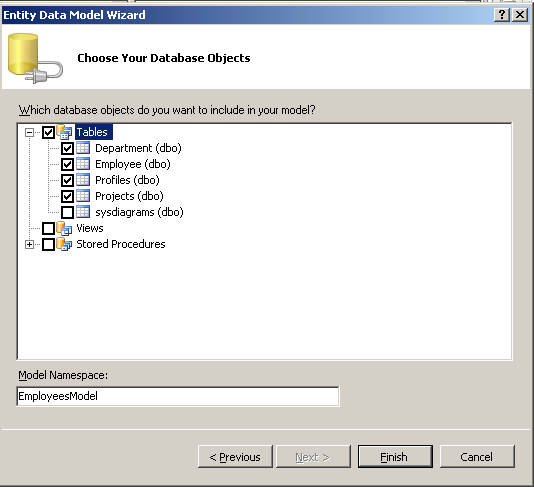
1. Right click on the Project and select Add -> New Item
2. Select the ADO.Net Entity Data Model Template
3. Give a name for the Model class, I will give it as EmployeeModel.edmx


4. Click Add. This will add a new DataModel file .edmx to the Project.
5. In the next Dialog which appears, select the option “Generate from Database”, click Next. This will automatically create the mappings between the Database Schema and the DataModel.
6. In the Next dialog, select the Database which you are planning to use, I will select the Employees database.


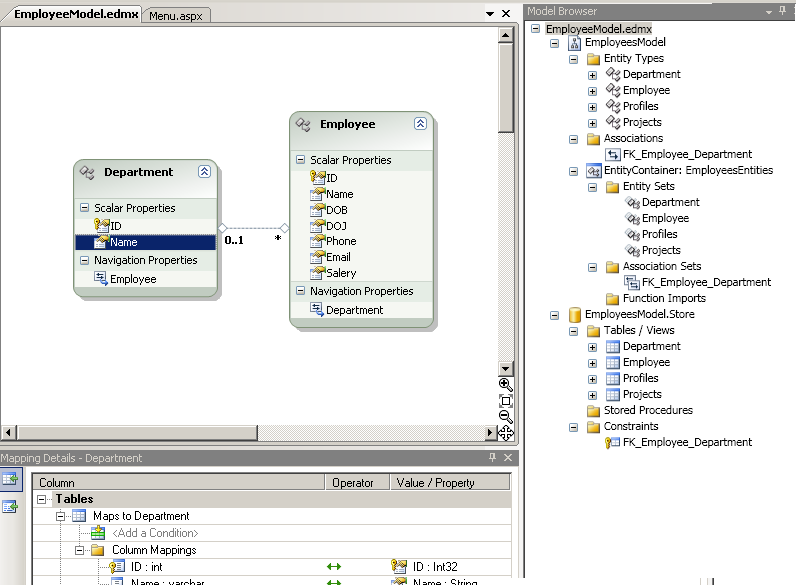
8. Select the Database objects which you want to map in your Model.
7. Test your connection click Next, give a name to the Model and click next.  
8. Select the Database objects which you want to map in your Model.


ADO.Net Entity Data Model Prerequisite


The following are the minimum pre-requisites to make use of ADO.Net Entity Data Model in your project.

.Net Framework 3.5  SP1

Visual Studio 2008 SP1
Make sure that you have Visual Studio 2008 SP1, ADO.Net Entity Data Model  Templates do        not come with the basic version of Visual Studio 2008, you need to have SP1 installed.

Targets Framework 3.5
Make sure that your Project is mapped to targets framework 3.5, you can check this is the Project Properties, in the Project properties window check that the Target Framework property is set to .net Framework 3.5 or Higher.


Latest versions like Visual Studio 2010 and 2012 have the ADO.Net Entity Data Model  Templates embedded from the basic version.

Another common thing which is overlooked is that the ADO.Net Entity Data Model Template is not a project type template, it is a file type template, means that you first need to create a project, then add ADO.Net Entity Data Model Template as one of the Items to the project.


Related Post
Concepts
ADO.NET Entity Framework
ADO.NET Entity Framework Architecture
Entity Data Model
LINQ To SQL Vs ADO.Net Entity Framework


Programming
ADO.Net Entity Data Model Prerequisite
Creating your First ADO.Net Entity Data Model
Selecting Data using ADO.Net Entity Framework
Selecting Data by Joining Tables using ADO.Net Entity Framework
Inserting Data using ADO.Net Entity Framework
Inserting Data with Foreign Key Reference using ADO.Net Entity Framework
Updating Data using ADO.Net Entity Framework
Updating Data with Foreign Key Reference using ADO.Net Entity Framework
Deleting Data using ADO.Net Entity Framework
Thursday, November 29, 2012

C# Windows Application Update app.config file

In the Post C# Windows Application Reading app.config file, we saw on how to read the key values in the App.config file, there are situations where we will have to update the values in the app.config file dynamically from within the application. 

In this post we shall see on how to update the values in the app.config file from the application.


App.config file before the update.

<?xml version="1.0" encoding="utf-8" ?>
<configuration>
  <appSettings>
    <add key="TestKey" value="OriginalTestValue" />
  </appSettings>

</configuration>

Code to Update the app.config file

XmlDocument
XmlDoc = new XmlDocument();
XmlDoc.Load(AppDomain.CurrentDomain.SetupInformation.ConfigurationFile);
XmlNode keyNode = XmlDoc.SelectSingleNode("/configuration/appSettings/add");
keyNode.Attributes[1].Value = "UpdatedTestValue";

XmlDoc.Save(AppDomain.CurrentDomain.SetupInformation.ConfigurationFile);

App.config file after the update.

<?xml version="1.0" encoding="utf-8"?>
<configuration>
  <appSettings>
    <add key="TestKey" value="UpdatedTestValue" />
  </appSettings>
</configuration>


Add a reference to the System.Xml Namespace, since we are parsing the app.Config file.
using System.Xml;