|
Excel Services
|
Showing posts with label Excel Services. Show all posts
Showing posts with label Excel Services. Show all posts
Tuesday, September 11, 2012
Wednesday, September 5, 2012
Changing cell value of a Published Excel Workbook using Excel Web services
Excel Web Services can be used to update data to Published Excel Work Sheets, in this post is will go through the steps to update data programatically using Excel Web Services, to a Published Excel worksheet.
In this example we will use the following Spreadsheet “Estimation.xlsx”, published in the “Excel Sheets” Document Library
http://vpc/Docs/Excel%20Sheets/Estimation.xlsx

6. Create and instance of the
service and set default credentials.
7. Get the Session ID for the current connection.
string sessionId = objExcel.OpenWorkbook(strWorkbookPath, "en-US", "en-US", out outStatus);
9. The values of the cells get updated, and can be checked by reading them back using the GetCell method.
10. In SharePoint 2007, the updated values get lost once the connection gets closed, SharePoint 2010 introduces the following new methods to update the values permanently in the workbook.
OpenWorkbookForEditing()
SaveWorkbook()
Here is the full code
using System;

1. Open the application from which needs to update data
to the Published Excel Worksheet using Excel Web Services.
2. I will use an Asp.Net web application to update the data.
3. Add a Web Reference to the Excel Web Services path.
2. I will use an Asp.Net web application to update the data.
3. Add a Web Reference to the Excel Web Services path.
http://<SiteName>/_vti_bin/excelservice.asmx
In my Server the path is
http://vpc/_vti_bin/excelservice.asmx
http://vpc/_vti_bin/excelservice.asmx
4. Name the Web reference as
ExcelWebService, VS.Net will create the proxy files to access to Web Service.
5. Create variables to store sheet name & file path
string strSheetName = "Estimation";
5. Create variables to store sheet name & file path
string strSheetName = "Estimation";
string
strWorkbookPath = "http://vpc/Docs/Excel%20Sheets/Estimation.xlsx";
In this example we will use the following Spreadsheet “Estimation.xlsx”, published in the “Excel Sheets” Document Library
http://vpc/Docs/Excel%20Sheets/Estimation.xlsx
ExcelWebService.ExcelService
objExcel = new ExcelWebService.ExcelService();
objExcel.Credentials = System.Net.CredentialCache.DefaultCredentials;
7. Get the Session ID for the current connection.
string sessionId = objExcel.OpenWorkbook(strWorkbookPath, "en-US", "en-US", out outStatus);
8. Enter the cell values to be
updated and click the update button in the Asp.net page.
In this
example we will set the Estimated and Actual hours spent for Estimation from
the Sheet.
Cells are accessed with a Zero based index.
Cells are accessed with a Zero based index.
objExcel.SetCell(sessionId, strSheetName, 2, 2, txtEstimate.Text);
objExcel.SetCell(sessionId,
strSheetName, 2, 3, txtActual.Text);
objExcel.CalculateWorkbook(sessionId,
ExcelWebService.CalculateType.Recalculate);
9. The values of the cells get updated, and can be checked by reading them back using the GetCell method.
10. In SharePoint 2007, the updated values get lost once the connection gets closed, SharePoint 2010 introduces the following new methods to update the values permanently in the workbook.
OpenWorkbookForEditing()
SaveWorkbook()
Here is the full code
using System;
using System.Collections.Generic;
using System.Linq;
using System.Web;
using System.Web.UI;
using System.Web.UI.WebControls;
using System.Web.Services.Protocols;
namespace WebServices_ObjectModel
{
public partial class ExcelWebServices : System.Web.UI.Page
{
protected
void btnUpdate_Click(object
sender, EventArgs e)
{
string
strSheetName = "Estimation";
string
strWorkbookPath = "http://vpc/Docs/Excel%20Sheets/Estimation.xlsx";
//
ExcelWebService.ExcelService objExcel = new
ExcelWebService.ExcelService();
//
objExcel.Credentials = System.Net.CredentialCache.DefaultCredentials;
//
try
{
string
sessionId = objExcel.OpenWorkbook(strWorkbookPath,
"en-US", "en-US",
out outStatus);
//
// Update
values to the WorkBook
objExcel.SetCell(sessionId,
strSheetName, 2, 2, txtEstimate.Text);
objExcel.SetCell(sessionId,
strSheetName, 2, 3, txtActual.Text);
objExcel.CalculateWorkbook(sessionId,
ExcelWebService.CalculateType.Recalculate);
//
// Read
the values Back.
object
cellValue = objExcel.GetCell(sessionId,
strSheetName, 2, 1, false, out outStatus);
Response.Write("Task: " + cellValue.ToString() + "
");
");
cellValue = objExcel.GetCell(sessionId, strSheetName, 2, 2, false, out
outStatus);
Response.Write("Estimate: " + cellValue.ToString() + "
");
");
cellValue = objExcel.GetCell(sessionId, strSheetName, 2, 3, false, out
outStatus);
Response.Write("Actual: " + cellValue.ToString() + "
");
");
//
objExcel.CloseWorkbook(sessionId);
}
catch (SoapException ex)
{
Response.Write("SOAP Exception : " + ex.Message);
}
}
}
}
Output:
Related Posts
Excel Services
Excel Services in SharePoint
Components of Excel Services
Publishing Excel Worksheets using Excel Service
Excel Web Services
Reading data from a Published Excel Workbook using Excel Web services
Updating data to a Published Excel Workbook using Excel Web services
Excel Services
Excel Services in SharePoint
Components of Excel Services
Publishing Excel Worksheets using Excel Service
Excel Web Services
Reading data from a Published Excel Workbook using Excel Web services
Updating data to a Published Excel Workbook using Excel Web services
Reading data from a Published Excel Workbook using Excel Web services
Excel Web Services can be used to query data from Published Excel Work Sheets, in this post is will go through the steps to read data programatically using Excel Web Services, from a Published Excel worksheet.
2. I will use an Asp.Net web application to read the data.
3. Add a Web Reference to the Excel Web Services path.
3. Add a Web Reference to the Excel Web Services path.
http://<SiteName>/_vti_bin/excelservice.asmx
In my Server the path is
http://vpc/_vti_bin/excelservice.asmx
http://vpc/_vti_bin/excelservice.asmx
4. Name the Web reference as
ExcelWebService, VS.Net will create the proxy files to access to Web Service.
5. Create variables to store sheet name, file path and the Status
string strSheetName = "Estimation";
5. Create variables to store sheet name, file path and the Status
string strSheetName = "Estimation";
string
strWorkbookPath = "http://vpc/Docs/Excel%20Sheets/Estimation.xlsx";
ExcelWebService.Status[] outStatus;
In this example we will use the following Spreadsheet “Estimation.xlsx”, published in the “Excel Sheets” Document Library
http://vpc/Docs/Excel%20Sheets/Estimation.xlsx
6. Create and instance of the
service and set default credentials.
ExcelWebService.ExcelService objExcel = new ExcelWebService.ExcelService();
ExcelWebService.ExcelService objExcel = new ExcelWebService.ExcelService();
objExcel.Credentials = System.Net.CredentialCache.DefaultCredentials;
7. Get the Session ID for the current connection.
string sessionId = objExcel.OpenWorkbook(strWorkbookPath, "en-US", "en-US", out outStatus);
8. Get the cell values and display
it in the Asp.net page.
In
this example we will get the Estimated and Actual hours spent for Estimation
from the Sheet.
Cells are accessed with a Zero based index.
object cellValue = objExcel.GetCell(sessionId, strSheetName, 2, 1, false, out outStatus);
Cells are accessed with a Zero based index.
object cellValue = objExcel.GetCell(sessionId, strSheetName, 2, 1, false, out outStatus);
Response.Write("Task:
" + cellValue.ToString() + "
");
");
cellValue = objExcel.GetCell(sessionId,
strSheetName, 2, 2, false, out outStatus);
Response.Write("Estimate:
" + cellValue.ToString() + "
");
");
cellValue = objExcel.GetCell(sessionId,
strSheetName, 2, 3, false, out outStatus);
Response.Write("Actual:
" + cellValue.ToString() + "
");
");
//
objExcel.CloseWorkbook(sessionId);
Here is the full code and Output
using System;
using System.Collections.Generic;
using System.Linq;
using System.Web;
using System.Web.UI;
using System.Web.UI.WebControls;
using System.Web.Services.Protocols;
namespace WebServices_ObjectModel
{
public partial class ExcelWebServices : System.Web.UI.Page
{
string
strSheetName = "Estimation";
string
strWorkbookPath = "http://vpc/Docs/Excel%20Sheets/Estimation.xlsx";
ExcelWebService.Status[] outStatus;
//
protected
void Page_Load(object
sender, EventArgs e)
{
ExcelWebService.ExcelService
objExcel = new ExcelWebService.ExcelService();
//
objExcel.Credentials = System.Net.CredentialCache.DefaultCredentials;
//
try
{
string
sessionId = objExcel.OpenWorkbook(strWorkbookPath, "en-US",
"en-US", out
outStatus);
//
object
cellValue = objExcel.GetCell(sessionId, strSheetName, 2, 1, false, out
outStatus);
Response.Write("Task: " + cellValue.ToString() + "
");
");
cellValue =
objExcel.GetCell(sessionId, strSheetName, 2, 2, false,
out outStatus);
Response.Write("Estimate: " + cellValue.ToString() + "
");
");
cellValue =
objExcel.GetCell(sessionId, strSheetName, 2, 3, false,
out outStatus);
Response.Write("Actual: " + cellValue.ToString() + "
");
");
//
objExcel.CloseWorkbook(sessionId);
}
catch
(SoapException ex)
{
Response.Write("SOAP Exception : " + ex.Message);
}
}
}
}
OutputTask: Requirements
Estimate: 150
Actual: 175
Related Posts
Excel Services
Excel Services in SharePoint
Components of Excel Services
Publishing Excel Worksheets using Excel Service
Excel Web Services
Reading data from a Published Excel Workbook using Excel Web services
Updating data to a Published Excel Workbook using Excel Web services
Excel Services
Excel Services in SharePoint
Components of Excel Services
Publishing Excel Worksheets using Excel Service
Excel Web Services
Reading data from a Published Excel Workbook using Excel Web services
Updating data to a Published Excel Workbook using Excel Web services
Excel Web Services
Excel Web Services
are a set of Web Service APIs which can be used by developers to access
published Excel workbooks, read data from the workbooks, updated data to the
workbooks etc.
The Excel Web Services provide a Session object which should be used to make successive calls to the web services, so that SharePoint will be able to identify all requests which come from a single application/service. This Session ID should be passed with all requests which are made from the current connection to maintain state.
The Excel Web Services provide a Session object which should be used to make successive calls to the web services, so that SharePoint will be able to identify all requests which come from a single application/service. This Session ID should be passed with all requests which are made from the current connection to maintain state.
Excel Web Services receives the inputs from the user and passes the same to Excel Calculation Services (ECS), ECS is responsible for performing the updates to the published Excel sheets, this interaction is abstracted from the user and happens internally, the user just needs to invoke the appropriate web service methods to query/update the data.
The List of Excel web services is available in the following path in the SharePoint server.
http:////_vti_bin/excelservice.asmx In my Server the path is
http://vpc/_vti_bin/excelservice.asmx
Where vpc is the default site created by SharePoint
2007
Calculate
CalculateA1
CalculateWorkbook
CancelRequest
CloseWorkbook
GetApiVersion
GetCell
GetCellA1
GetRange
GetRangeA1
GetSessionInformation
GetWorkbook
OpenWorkbook
Refresh
SetCell
SetCellA1
SetRange
SetRangeA1
For details on each of these web methods refer to the following Microsoft’s page.
http://msdn.microsoft.com/en-us/library/ff384274(v=office.12).aspx
Related Posts
Excel Services
Excel Services in SharePoint
Components of Excel Services
Publishing Excel Worksheets using Excel Service
Excel Web Services
Reading data from a Published Excel Workbook using Excel Web services
Updating data to a Published Excel Workbook using Excel Web services
Excel Services
Excel Services in SharePoint
Components of Excel Services
Publishing Excel Worksheets using Excel Service
Excel Web Services
Reading data from a Published Excel Workbook using Excel Web services
Updating data to a Published Excel Workbook using Excel Web services
Publishing Excel Worksheets using Excel Service
Excel Work Books and individual Excel sheets can be published in SharePoint server, once Published the sheets can be viewed by other users in their Browser, they need not have MS Office Installed in their PC.
To Publish an Excel WorkBook in a SharePoint server use the following Steps.
1. Create a new Document Library, to store the Excel workbooks which needs to be published.
2. Add the newly created Document Library to the list of Trusted Locations.
(For a Spread Sheet to be published in SharePoint it should be placed in a Trusted location.)
3. To Add the Document Library to a Trusted Location open the Central Administrator Site.
4. Click on the Shared Service under Shared Service Administration.


10. Once done, click on the Office icon and select the Publish -> Excel Services.


13. Select the sheets which needs to be published, in this case we will select only the Estimation sheet.


16. Click on the option to Open tool pane

19. Select the Worksheet to be published and Click OK

To Publish an Excel WorkBook in a SharePoint server use the following Steps.
1. Create a new Document Library, to store the Excel workbooks which needs to be published.
2. Add the newly created Document Library to the list of Trusted Locations.
(For a Spread Sheet to be published in SharePoint it should be placed in a Trusted location.)
3. To Add the Document Library to a Trusted Location open the Central Administrator Site.
4. Click on the Shared Service under Shared Service Administration.
5. Under Excel Services Settings click on Trusted File Locations.
6. Click Add Trusted File Locations.
7. Enter the full path of the Document Library, enter a Description, Check the Checkboxes “Trusted data connection libraries & embedded” and “Children Trusted”.
8. Leave the other default settings, click OK.

9. Now open an Excel Workbook, enter data and create a chart in Excel
10. Once done, click on the Office icon and select the Publish -> Excel Services.

11. Select a location to save the file.
12. Click the Excel Services Options button.
13. Select the sheets which needs to be published, in this case we will select only the Estimation sheet.

14. Click Ok -> Click Save. Upload the Spreadsheet
to the Document Library which we created earlier.
If you
have access to the SharePoint server from the machine where you create the
Excel Worksheet, then you can publish
it directly to the SharePoint Document Library.
Office button -> Publish -> Excel Services, fill in
the URL to the document library where you want to save your Excel spreadsheet. The workbook will get save to the Document
Library automatically.
15. Now, go back to SharePoint, Open the page
where you wish to host your Excel Charts
-> Edit Page
-> Add New Web Part
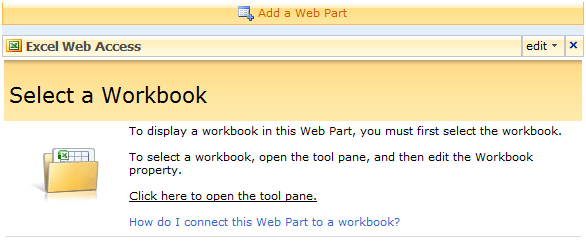
-> Select Excel Web Access Webpart, click Add

16. Click on the option to Open tool pane
17. Select Workbook dialog in the Tools pane.
18. Enter the relative path of the Document Library, in the Location Box
/Docs/Excel
Sheets/Forms/AllItems.aspx
19. Select the Worksheet to be published and Click OK
20. In the Tools Pane Click Apply.
21. The worksheet will get displayed inside the Web Part.
22. Click Ok and close the Tools Pane.
23. The Worksheet is now added to the page.
The Worksheet is finally Published in SharePoint
Related Posts
Excel Services
Excel Services in SharePoint
Components of Excel Services
Publishing Excel Worksheets using Excel Service
Excel Web Services
Reading data from a Published Excel Workbook using Excel Web services
Updating data to a Published Excel Workbook using Excel Web services
Excel Services
Excel Services in SharePoint
Components of Excel Services
Publishing Excel Worksheets using Excel Service
Excel Web Services
Reading data from a Published Excel Workbook using Excel Web services
Updating data to a Published Excel Workbook using Excel Web services
Subscribe to:
Posts (Atom)


