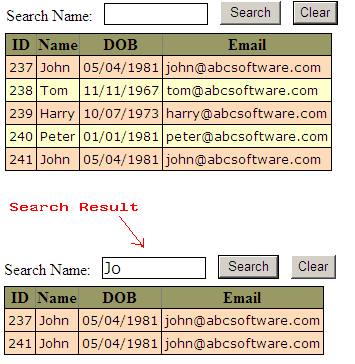
Tuesday, July 31, 2012

Asp.Net jQuery GridView Tutorial


jQuery provides a number of useful client side functionalities on the Asp.net GridView control like Style, Row count, Column count, Search, Filter etc

In the following example I have tried to cover all the possible scenarios which we come across while using a GridView control. 

Asp.Net jQuery GridView Filter Autocomplete Style

jQuery can be used to perform a dynamic (Autocomplete style) filter on the rows of an Asp.Net GridView control. The Client side Filter operation can be performed by looping through all the rows in the GridView and filtering the text in a specific column whenever the text is changed in the filter TextBox. 


In this example we shall see on how to implement a client side Autocomplete style filter on a GridView control using jQuery. 


Asp.Net jQuery GridView Search Client Side

jQuery can be used to perform a Client side Search operation on the Asp.Net GridView control. The search operation can be performed by looping through all the rows in the GridView and filtering the text in a specific column. 


In this example we shall see on how to implement a client side search on a GridView control using jQuery.


Asp.Net Free Rich Text Editor using NicEdit Editor - Loading Content

NicEdit is a Javascript Based, WYSIWYG Editor, here we shall see on how to load content into the Editor from a database.


Asp.Net Free Rich Text Editor using NicEdit Editor - Insert Text Into Database

NicEdit is a Javascript Based, WYSIWYG Editor, here we shall see on how to get the text entered in the Editor and insert it into the Database. 


Monday, July 30, 2012

Asp.Net Free Rich Text Editor using NicEdit Editor - Custom Interface

We can convert an Asp.Net Area (TextBox with TextMode="MultiLine") into a Rich Text Editor with advanced features by integrating it with the NicEdit editor.


NicEdit is a FREE Javascript Based WYSIWYG Editor, it provides many simple advanced and custom modes to apply rich text editor effect, here we shall see on how to integrate a Custom Rich Text Editor interface.


Asp.Net Free Rich Text Editor using NicEdit Editor - Advanced Interface

We can convert an Asp.Net Area (TextBox with TextMode="MultiLine") into a Rich Text Editor with advanced features by integrating it with the NicEdit editor.


NicEdit is a FREE Javascript Based WYSIWYG Editor, it provides many simple advanced and custom modes to apply rich text editor effect, here we shall see on how to integrate an advanced Rich Text Editor interface.


This advanced interface will display all options, hence has more features than the simple interface.

To integrate the NicEdit editor, download the latest editor files from their site, it’s free!!!
http://nicedit.com/download.php

Once downloaded, extract the files and place them in a subfolder under your main Asp.Net project path.

 Open the Asp.Net page and add a reference to the Editor file as follows.

<script type="text/javascript" src= "JavaScript/nicEdit/nicEdit.js"></script>

Now add initializing code to integrate the TextBox with the Editor as follows.

    <script type="text/javascript">
        bkLib.onDomLoaded(function() {
            new nicEditor({
                fullPanel: true
            }).panelInstance('txtAdvansedTextArea');
        });
    </script>


Build and run the application, you can see that your TextBox is displayed as a Rich Text editor after integrating it with the NicEdit Editor.

Here is the Full Example.

<html xmlns="http://www.w3.org/1999/xhtml" >
<head runat="server">
    <title>Rich Text Editor (NicEdit)</title>
    <script type="text/javascript" src= "JavaScript/nicEdit/nicEdit.js"></script>
    <script type="text/javascript">
        bkLib.onDomLoaded(function() {
            new nicEditor({
                fullPanel: true
            }).panelInstance('txtAdvansedTextArea');
        });
    </script>
</head>
<body>
    <form id="frmRichTextEditor" runat="server">
        <table>
            <tr valign="top">
                <td>
                   Advanced RichText Box
                </td>
                <td>
                    <asp:TextBox
                        ID="txtAdvansedTextArea"
                        runat="server"
                        TextMode="MultiLine"
                        Height="100px"
                        Width="400px"></asp:TextBox>
                </td>
            </tr>
        </table>
    </form>
</body>
</html>


Asp.Net Free Rich Text Editor using NicEdit Editor - Simple Interface

We can convert an Asp.Net Area (TextBox with TextMode="MultiLine") into a Rich Text Editor with advanced features by integrating it with the NicEdit editor.


NicEdit is a FREE Javascript Based WYSIWYG Editor, it provides many simple advanced and custom modes to apply rich text editor effect, here we shall see on how to integrate a simple Rich Text Editor interface.


To integrate the NicEdit editor, download the latest editor files from their site, it’s free!!!
http://nicedit.com/download.php

Once downloaded, extract the files and place them in a subfolder under your main Asp.Net project path.

 Open the Asp.Net page and add a reference to the Editor file as follows.

<script type="text/javascript" src= "JavaScript/nicEdit/nicEdit.js"></script>

Now add initializing code to integrate the TextBox with the Editor as follows.

    <script type="text/javascript">
        bkLib.onDomLoaded(function() {
            new nicEditor().panelInstance('txtSimpleText');
        });
    </script>


Build and run the application, you can see that your TextBox is displayed as a Rich Text editor after integrating it with the NicEdit Editor.

Here is the Full Example.

<html xmlns="http://www.w3.org/1999/xhtml" >
<head runat="server">
    <title>Rich Text Editor (NicEdit)</title>
    <script type="text/javascript" src= "JavaScript/nicEdit/nicEdit.js"></script>
    <script type="text/javascript">
        bkLib.onDomLoaded(function() {
            new nicEditor().panelInstance('txtSimpleText');
        });
    </script>
</head>
<body>
    <form id="frmRichTextEditor" runat="server">
        <table>
            <tr valign="top">
                <td>
                   Simple RichText Box
                </td>
                <td>
                    <asp:TextBox
                        ID="txtSimpleText"
                        runat="server"
                        TextMode="MultiLine"
                        Height="100px"
                        Width="400px"></asp:TextBox>
                </td>
            </tr>
        </table>
    </form>
</body>
</html>


Asp.Net Free Rich Text Editor using Tiny MCE Editor - Loading Content


TinyMCE is a Javascript Based, WYSIWYG Editor, here we shall see on how to load content into the Editor from a database.


To see on how to integrate the editor with an Asp.net textbox refer to the post 
Asp.Net Free Rich Text Editor using Tiny MCE Editor - Simple Interface.

To see on how to insert data from the editor to the database refer to the post 
Asp.Net Free Rich Text Editor using Tiny MCE Editor - Insert Text Into Database.

Content can be loaded into the Editor as HTML tags, we will load the content from the database, which we stored in the post 
We can use a normal SELECT query to fetch and load the HML tags into the Editor.

string strSql = "SELECT TOP 1 * FROM Projects ORDER BY ProjectID DESC";
//
string strConn = ConfigurationManager.ConnectionStrings["ConnectionString"].ToString();
objConn = new SqlConnection(strConn);
objCmd = new SqlCommand(strSql, objConn);
objDA = new SqlDataAdapter(objCmd);
dsProjects = new DataSet();
objDA.Fill(dsProjects, "dtProjects");
//
txtDescription.Text = dsProjects.Tables["dtProjects"].Rows[0]["ProjectDescription"].ToString();


Asp.Net Free Rich Text Editor using Tiny MCE Editor - Insert Text Into Database

TinyMCE is a Javascript Based, WYSIWYG Editor, here we shall see on how to get the text entered in the Editor and insert it into the Database. 


To see on how to integrate the editor with an Asp.net textbox refer to the post Asp.Net Free Rich Text Editor using Tiny MCE Editor - Simple Interface

The editor gives the text in the textbox as HTML tags with all the formatting, we just need to fetch the text using the .text property and save the HTML Tags


txtDescription.Text

Let us consider the following Table structure; we shall store the content of the Rich Text Editor into this table.

The INSERT query is a simple query, and needs no alterations to handle the content of the Rich Text Editor
string strSql = "INSERT INTO Projects (ProjectName,ProjectDescription) VALUES (";
            strSql += "'" + txtName.Text + "',";
            strSql += "'" + txtDescription.Text + "')";
            //
            string strConn = ConfigurationManager.ConnectionStrings["ConnectionString"].ToString();
            objConn = new SqlConnection(strConn);
            objCmd = new SqlCommand(strSql,objConn);
            objConn.Open();
            objCmd.ExecuteNonQuery();
            objConn.Close();

One inserted the data in the table looks as follows.


Apply TinyMCE Editor to specific textarea

The TinyMCE WYSIWYG Editor, by default applies the Rich Text Theme to all the TextAreas in a page, however we would need the theme only to specific textareas in the page, in such cased the theme can be restricted to specific text areas by tagging them to a specific class name.

editor_selector: "mceEditor"


TinyMCE is a Javascript Based, WYSIWYG Editor, it provides many simple advanced and custom modes to apply rich text editor effect. To know more about the TinyMCE WYSIWYG Editor, refer to the post Asp.Net Free Rich Text Editor using Tiny MCE Editor - Simple Interface.

Now add initializing code to integrate the TextBox with the Editor as follows.

    <script type="text/javascript">
        tinyMCE.init({
            mode: "textareas",
            theme: "simple",             editor_selector: "mceEditor"
        });
    </script>

Build and run the application, notice that the TinyMCE Editor is integrated only with the TextBox which has the class specified as 

Here is the Full Example.

<html xmlns="http://www.w3.org/1999/xhtml" >
<head runat="server">
    <title>Rich Text Editor (TinyMCE)</title>
    <script type="text/javascript"
         src= "JavaScript/tiny_mce/tiny_mce.js"></script>
    <script type="text/javascript">
        tinyMCE.init({
            mode: "textareas",
            theme: "simple",
            editor_selector :"mceEditor"       
});
    </script>
</
head>
<body>
<form id="frmRichTextEditor" runat="server">
<
table>
        <tr valign="top">
            <td style="font-family:Verdanafont-size:12px">
                Enter Project Description
            </td>
            <td>
                <asp:TextBox
                    ID="txtDescription"
                    runat="server"
                    TextMode="MultiLine"
                    Height="150px"
                    Width="400px"
                    class="mceEditor"></asp:TextBox>
            </td>
        </tr>  
        <tr valign="top">
            <td style="font-family:Verdana; font-size:12px">
                Enter User Description
            </td>
            <td>
                <asp:TextBox
                    ID="txtUserDescription"
                    runat="server"
                    TextMode="MultiLine"
                    Height="150px"
                    Width="400px"></asp:TextBox>
            </td>
        </tr> 
</table>
</form>
</body>
</html>