Excel Work Books and individual Excel sheets can be published in SharePoint server, once Published the sheets can be viewed by other users in their Browser, they need not have MS Office Installed in their PC.
To Publish an Excel WorkBook in a SharePoint server use the following Steps.
1. Create a new Document Library, to store the Excel workbooks which needs to be published.
2. Add the newly created Document Library to the list of Trusted Locations.
(For a Spread Sheet to be published in SharePoint it should be placed in a Trusted location.)
3. To Add the Document Library to a Trusted Location open the Central Administrator Site.
4. Click on the Shared Service under Shared Service Administration.


10. Once done, click on the Office icon and select the Publish -> Excel Services.


13. Select the sheets which needs to be published, in this case we will select only the Estimation sheet.


16. Click on the option to Open tool pane

19. Select the Worksheet to be published and Click OK

To Publish an Excel WorkBook in a SharePoint server use the following Steps.
1. Create a new Document Library, to store the Excel workbooks which needs to be published.
2. Add the newly created Document Library to the list of Trusted Locations.
(For a Spread Sheet to be published in SharePoint it should be placed in a Trusted location.)
3. To Add the Document Library to a Trusted Location open the Central Administrator Site.
4. Click on the Shared Service under Shared Service Administration.
5. Under Excel Services Settings click on Trusted File Locations.
6. Click Add Trusted File Locations.
7. Enter the full path of the Document Library, enter a Description, Check the Checkboxes “Trusted data connection libraries & embedded” and “Children Trusted”.
8. Leave the other default settings, click OK.

9. Now open an Excel Workbook, enter data and create a chart in Excel
10. Once done, click on the Office icon and select the Publish -> Excel Services.

11. Select a location to save the file.
12. Click the Excel Services Options button.
13. Select the sheets which needs to be published, in this case we will select only the Estimation sheet.

14. Click Ok -> Click Save. Upload the Spreadsheet
to the Document Library which we created earlier.
If you
have access to the SharePoint server from the machine where you create the
Excel Worksheet, then you can publish
it directly to the SharePoint Document Library.
Office button -> Publish -> Excel Services, fill in
the URL to the document library where you want to save your Excel spreadsheet. The workbook will get save to the Document
Library automatically.
15. Now, go back to SharePoint, Open the page
where you wish to host your Excel Charts
-> Edit Page
-> Add New Web Part
-> Select Excel Web Access Webpart, click Add

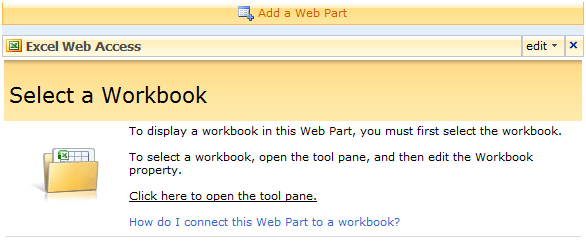
16. Click on the option to Open tool pane
17. Select Workbook dialog in the Tools pane.
18. Enter the relative path of the Document Library, in the Location Box
/Docs/Excel
Sheets/Forms/AllItems.aspx
19. Select the Worksheet to be published and Click OK
20. In the Tools Pane Click Apply.
21. The worksheet will get displayed inside the Web Part.
22. Click Ok and close the Tools Pane.
23. The Worksheet is now added to the page.
The Worksheet is finally Published in SharePoint
Related Posts
Excel Services
Excel Services in SharePoint
Components of Excel Services
Publishing Excel Worksheets using Excel Service
Excel Web Services
Reading data from a Published Excel Workbook using Excel Web services
Updating data to a Published Excel Workbook using Excel Web services
Excel Services
Excel Services in SharePoint
Components of Excel Services
Publishing Excel Worksheets using Excel Service
Excel Web Services
Reading data from a Published Excel Workbook using Excel Web services
Updating data to a Published Excel Workbook using Excel Web services


No comments:
Post a Comment